

Introduction
One of many low-hanging fruits I still see in our Active Directory Security Analysis and Internal Penetration Test is clear text credentials stored on domain-wide accessible network shares. These credentials are sometimes for service accounts and Domain Admins, meaning a threat actor with access to any user could compromise the entire Active Directory and its systems.
A classic example is finding a 'web.config' file, in this example it contains credentials for SQL and SAP. The credentials may also be reused for other users:

When observing sensitive information on shares we typically recommend an in-depth share analysis. Even if you were never recommended performing such an analysis, I highly recommend it. This post contains a few parts of our newly announced service Network Share Security Analysis in which we perform a full in-depth analysis covering more security risks.
Firstly, this post will research the cause of this risk and try to address the root cause. Thereafter we dive into analyzing shares in an environment
What is the root cause?
Describing the root cause is easiest with a practical demonstration. Say a sysadmin needs a backup share and creates the directory “C:\backup”:

Before being shared, the “C:\backup” directory has inherited the NTFS permissions of the C: root drive (NTFS permissions = “Security” tab):

Default root drive NTFS permissions depend on the OS:
Windows Server
CREATOR OWNER: Full control
SYSTEM: Full control
The creating user ([email protected]): Full control
The local Administrators group: Full control
The local Users group: Read & execute
The local Users group: Special
Create files / write data
Create folders / append data
Windows desktop
SYSTEM: Full control
The local Administrators group: Full control
The local Users group: Read & execute
Authenticated Users: Modify
When accessing a share, firstly share permissions are validated, then NTFS permissions. We therefore need to ensure at least one layer restrict unwanted users. Let’s investigate how permissions are set when sharing…
I assume most misconfigurations are made by sysadmins via the folder properties GUI. On the “Sharing” tab, we have two options “Share…” and “Advanced Sharing...”:>

Sharing via “Share…”

This brings up the “Network access” window, this controls the future NTFS permissions and will give “Owner” rights to the user initiating the share:

The “Sharing” tab now states the directory is shared:

If we check back at NTFS permissions in the “Security” tab we see that inheritance has been disabled and permissions only granted to:
- SYSTEM
- The initiating user ([email protected])
- The local administrator’s group
Be aware that the automatic change of NTFS permissions may take a moment:

When a user accesses a share, first the share permissions are processed, thereafter the NTFS permissions. Let’s look at what share permissions have been set by clicking “🛡Advanced Sharing...”:

Then “Permissions”:

Here we see that share permissions grant Full Control to both “Everyone” and the local “Administrators” group. Allowing “Everyone” is less optimal, but remember that NTFS permissions are processed too and the share contents are therefore still secured.

Sharing via “Advanced Sharing...”
Let’s try to create the share again, this time using “Advanced Sharing…”:

Sharing is enabled by checking “Share this folder”, and now it is (way too) easy to click OK:

But click the “Permissions” button and we see that “Everyone” by default has been granted read permissions:

That seems bad, but we saw before that NTFS permissions were changed after sharing - thereby stopping the permissive share permissions. Well… after sharing the NTFS permissions have not changed:

What now? Now we have a share where:
Share permissions grant:
Everyone: Read
NTFS permissions grant:
CREATOR OWNER: Full control
SYSTEM: Full control
The creating user ([email protected]): Full control
The local Administrators group: Full control
The local Users group: Read & execute
The local Users group: Special
Create files / write data
Create folders / append data
It seems less strict than before, but surely it can’t be that bad since the “Users” group is a local group, but in this we do find that “Domain Users” is a member:

This means that our sysadmin has granted “Domain Users” read access to the backup. Whoops!
Based on this research I believe most misconfigured permissions are due to the “ Advanced Sharing…” method creating a combination of:
1. The default share permissions granting “Everyone” read permissions.
2. The Shares created in the drive root inherits NTFS permissions granting the local “Users” group modify permissions (and for Windows desktop “Authenticated Users” modify permissions).
Reduce the risk of overly exposed shares
I suggest the following methods of reducing the risks described, here listed in most to least useful in my opinion:
1. Change default Windows share permissions when using “🛡 Advanced Sharing…” (explained below).
2. Follow a procedure for creating new shares, which includes setting either, and preferably both, share permissions and NTFS permissions based on the principle of least privilege.
3. Perform regular network share analysis, including enumerating shares, identifying weak permissions, and analyzing share contents for sensitive content (explained below).
4. Detect threat actors enumerating shares with honey shares (explained below).
5. Remove Domain Users from the local Users group. I did not research this, but it may break stuff.
Changing default Windows share permissions
I propose lowering the probability of misconfiguration by making the default share permissions blank. This configuration will be a hardening step we perform for clients going forward:

The configuration is set with the registry property “SrvsvcDefaultShareInfo” in “HKLM:\CurrentControlSet\Services\LanmanServer\DefaultSecurity” that does not exist by default. Be aware for settings to take effect on some servers (e.g., Domain Controllers) the “LanmanServer” service must be restarted.
Group Policy deployment
To create a GPO to be manually linked, run:
$SDDL = "O:BAG:DUD:"$CommonSecurityDescriptor = (ConvertFrom-SddlString $SDDL).RawDescriptor$byteArray = New-Object byte[] $CommonSecurityDescriptor.binarylength$CommonSecurityDescriptor.GetBinaryForm($byteArray, 0)$GPO = New-GPO -Name "Default share permission set to empty" -Comment "This removes the default share permission (DACL) granting read access to 'Everyone' on new shares created."$GPO | Set-GPPrefRegistryValue -Context Computer -Action Update -Key "HKLM\SYSTEM\CurrentControlSet\Services\LanmanServer\DefaultSecurity" -Type Binary -Value $byteArray -ValueName "SrvsvcDefaultShareInfo"This creates a GPO containing a registry item in: Computer Configuration > Preferences > Windows Settings > Registry:


Action: Update
Hive: HKEY_LOCAL_MACHINE
Key Path: SYSTEM\CurrentControlSet\Services\LanmanServer\DefaultSecurity
Value name: SrvsvcDefaultShareInfo
Value type: REG_BINARY
Value data: <unique to your domain>
The value data will be unique to your domain since it contains the SID of your Domain Users group. For GUI creation you can get the string for “Value data” by running:
$SDDL = "O:BAG:DUD:"$CommonSecurityDescriptor = (ConvertFrom-SddlString $SDDL).RawDescriptor$byteArray = New-Object byte[] $CommonSecurityDescriptor.binarylength$CommonSecurityDescriptor.GetBinaryForm($byteArray, 0)[System.BitConverter]::ToString($byteArray) -replace "-"PowerShell deployment
To deploy the registry property with PowerShell without changing Primary Group defaults; run the commands on each system:
$SDDL = "O:BAG:DUD:"$CommonSecurityDescriptor = (ConvertFrom-SddlString $SDDL).RawDescriptor$byteArray = New-Object byte[] $CommonSecurityDescriptor.binarylength$CommonSecurityDescriptor.GetBinaryForm($byteArray, 0)New-ItemProperty "HKLM:\SYSTEM\CurrentControlSet\Services\LanmanServer\DefaultSecurity" -Name SrvsvcDefaultShareInfo -PropertyType Binary -Value $byteArray -ForceWhat is SrvsvcDefaultShareInfo, and what is the binary value?
If needed, the following resources are recommended for a deeper understanding in security descriptors:
https://helgeklein.com/blog/permissions-a-primer-or-dacl-sacl-owner-sid-and-ace-explained
https://docs.microsoft.com/en-us/windows/win32/secauthz/security-descriptor-definition-language
Let us explore share security descriptors… You can get an existing share’s security descriptor in two ways:
1. With Registry Editor at the key “HKLM\SYSTEM\CurrentControlSet\Services\LanmanServer\Shares\Security”, here the security descriptor is a value for a property with the share’s name:
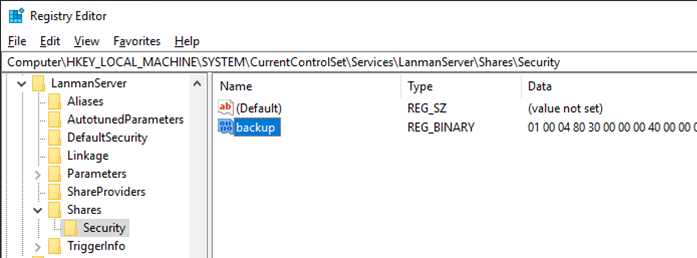

a. This can be decoded with:
$binary = (Get-ItemProperty "HKLM:\SYSTEM\CurrentControlSet\Services\LanmanServer\Shares\Security" -Name "backup").backup
New-Object System.Security.AccessControl.CommonSecurityDescriptor($false, $false, $binary, 0)
(New-Object System.Security.AccessControl.CommonSecurityDescriptor($false, $false, $binary, 0)).GetSddlForm("All")

2. Using PowerShell, you can get the security descriptor, however it will not translate SIDs into domain groups:
Get-SmbShare backup | select -ExpandProperty SecurityDescriptor(Get-SmbShare backup | select -ExpandProperty SecurityDescriptor | ConvertFrom-SddlString).RawDescriptor
Note: The SDDL of the NTFS permissions can be found with: Get-SmbShare templateShare | select -ExpandProperty PresetPathAcl | select Sddl
Default security descriptors can be set with the property “SrvsvcDefaultShareInfo” in “SYSTEM\CurrentControlSet\Services\LanmanServer\DefaultSecurity”. It does not exist by default.
By not having the registry property and creating a share we can find the default share security descriptor. Here is the default as SDDL format for a non-domain joined system:
O:BAG:S-1-5-21-1913182837-2919299532-33242777-513D:(A;;0x1200a9;;;WD)The bold text is the system’s SID, so the format is:
O:BAG:S-1-5-21-<SID>-513D:(A;;0x1200a9;;;AU)For a domain joined system it is:
O:BAG:DUD:(A;;0x1200a9;;;WD)The domain joined system’s SDDL translates to:

My recommended fix is simply to remove Everyone by changing the default security descriptor to:
O:BAG:DUD:This SDDL translates to:

Notice that the SDDL has an empty DACL “D:”, the DACL must be empty and not removed; from Windows Internals, Part 1, 7th edition “If no DACL is present (a null DACL) in a security descriptor, everyone has full access to the object. If the DACL is empty (that is, it has zero ACEs), no user has access to the object.”
For an additionally hardened configuration (with an atomic chance of breaking stuff) I suggest setting the primary group to “NT AUTHORITY\SYSTEM” instead of “Domain Users” with the SDDL:
O:BAG:SYD:I did not find why “Domain Users” is set as primary group, and based on tests, removing the group has no consequences. This is confirmed by Windows Internals, Part 1, 7th edition: “The SID of the primary group for the object (used only by POSIX subsystem, now unused since POSIX) is no longer supported.”.
Having “NT AUTHORITY\SYSTEM” as primary group is for some reason the default of a Domain Controller’s NETLOGON and SYSVOL shares:

Finally, the following converts any SDDL string to a registry value that can be used in a GPO, here with the hardened primary group setting:
$SDDL = "O:BAG:SYD:"$CommonSecurityDescriptor = ConvertFrom-SddlString $SDDL | select -ExpandProperty RawDescriptor$binaryLength = $CommonSecurityDescriptor.binarylength$byteArray = New-Object byte[] $binaryLength$CommonSecurityDescriptor.GetBinaryForm($byteArray, 0)[System.BitConverter]::ToString($byteArray) -replace "-" 
Notes on “LanmanServer\DefaultSecurity”
As a late note, in my research I discovered that in “HKLM\SYSTEM\CurrentControlSet\Services\LanmanServer\DefaultSecurity” only the “SrvsvcDefaultShareInfo” property does not exist by default, and almost no knowledge of the property can be found except in these resources:
https://helgeklein.com/blog/where-are-share-permissions-stored-hint-registry/
I have also found the following property descriptions of “HKLM\SYSTEM\CurrentControlSet\Services\LanmanServer\DefaultSecurity”:
SrvsvcConfigInfo: Manage file and printer sharing
SrvsvcConnection: Manage file/print server connections
SrvsvcDefaultShareInfo Manage default Share Permissions
SrvsvcFile: Manage file server open files
SrvsvcServerDiskEnum: Enumerate file servers disks
SrvsvcSessionInfo: Manage file/print server sessions
SrvsvcShareAdminConnect: Connect to administrative shares
SrvsvcShareAdminInfo: Manage administrative shares
SrvsvcShareChange: ?
SrvsvcShareConnect: Connect to file and printer shares
SrvsvcShareFileInfo: Manage file shares
SrvsvcSharePrintInfo: Manage printer shares
SrvsvcStatisticsInfo: Read file/print server statistics
SrvsvcTransportEnum: Enumerate server transport protocols
These are stated in the blogpost by Helge Klien and originally in this paper: https://papers.vx-underground.org/papers/VXUG/Mirrors/WindowsNetworkServicesInternals.pdf
Network share analysis introduction
Previously we investigated and likely addressed the root cause of risk, but this does not remove already misconfigured shares. To find these we must do a network share analysis.
A full analysis covers many points, this post highlights just four which I identify as the highest risks:
1. Readable shares containing credentials (passwords, API-keys, private-keys, etc.)
2. Readable shares containing personal identifiable data
3. Readable shares containing database and backup files
4. Modifiable shares containing applications and configurations
Preparing for scan
You could ask the questions “How many shares are reachable by as guest on our WiFi?”, “How many shares are reachable by a compromised developer account?”. In other words, we ask:
· What is the user context?
· Which networked share servers are reachable?
User context
Firstly, I recommend only focusing on low hanging fruit; therefore, we will create a regular Domain User – with no other privileges:

The privileges of the user account decide which shares and files you will be able to discover and to read the contents of.
Using a Domain Admin (DA) or similar highly privileged role might result in finding more shares and sensitive content; however, this would result in much more data parsing, and authenticating with high privileges to any system on your network can be risky. If you choose to do so, make sure to understand AD tiering and techniques such as NTLM capture and relaying.
The user account should be granted access to log on to a system from where the scanning is made.
Network access
My recommendation for network access, would be putting the scanning system executing scan on the same network as most of your devices. You could also spend more time and allow the scanning system to reach all systems on the whole network while still preventing incoming traffic (allow outgoing, deny incoming, allow established incoming).
The tools
Tools to be used are:
The Find-DomainShare cmdlet from PowerView on GitHub
SauronEye on GitHub
(The links above are directly to commits and releases which I know are non-malicious).
AccessEnum by Microsoft
PowerShell
These should all be placed on your scanning system. Improsec has internally developed tools, but these public tools have been tested and used by us in previous engagements.
Before visiting the links, start downloading, and executing the tools be sure that their binaries and techniques are on your allowlist. Some AV/EDR solutions will flag the first two tools as malicious.
With all these formalities done, let us start analyzing!
Enumerating network shares
PowerView has the cmdlet Find-DomainShare which requests a DC for every AD computer’s “DNSHostname” property, then contacts every computer to enumerate its shares - including “hidden” ‘$’ shares!
From the scanning system either log in as your dedicated share scanning user, or use PowerShell to execute the following by running the command (replacing the domain\user):
runas /user:hackme\sharesearcher powershell.exe
Then run the PowerView cmdlet:
# Import PowerViewImport-Module .\PowerView.ps1# Enumerate shares on domain$results = Invoke-ShareFinder -CheckShareAccess -Verbose# Export results to CSV$results | Select-Object -Property @{N="UNC";E={"\\" + $_.ComputerName + "\" + $_.Name}} | Export-Csv Shares.csv -Encoding unicode -NoTypeInformationYou may get errors regarding an empty “DNSHostname” property – you can ignore it but be aware some computer objects in your AD will not be enumerated. Objects with an empty property are likely not Windows computers.

The share enumeration is done. In the above screenshot the “$results” object contains six shares:
The top two on “DC01” marked with red are non-default shares which we do not expect to see on a DC.
The middle two on “DC01” are default domain controller shares.
The bottom two on “client01” are shares on the system the scanning is performed from. These should not be included in your scanning. Additionally, the results are now saved in the CSV “Shares.csv”, this will be used when scanning shares for information with SauronEye.
Look through the list – you may find surprisingly many domain-wide accessible shares.
You can already now set stricter NTFS permissions and share permissions on obviously sensitive shares but be aware this will make your scanning user not able to scan the shares in the next phase.

Scanning network shares for sensitive information
Now we can use the share list with SauronEye, which can scan contents of all share files for specific keywords.
First prepare your CSV for SauronEye input – remove the share lines relating to your current Windows system, e.g., “\\client01.hackme.local\C$”.
Then remove any similar shares that contain large amounts of files and will slow down the scan. You should not ignore the removed shares but identify why they are available to Domain Users – e.g., are Domain Users granted administrator access on the system, or is the C-drive shared with Authenticated Users (as explored in the start of the post)?
Readable shares containing credentials (passwords, API-keys, private-keys, etc.)
Exposing credentials, especially in clear text, on network shares can allow for privilege escalation and compromise of systems and users.
You should be aware that any found credentials should be considered compromised and changed. Even if they are not valid for e.g., the system hosting the share, a threat actor could check for credential reuse/overlap throughout the infrastructure via credential stuffing. Therefore, ensure any found credentials are cross checked with any other account in your infrastructure.
The following are SauronEye’s accepted arguments:

For this scan we use the following arguments:

We will run the following to grab the saved CSV and save it into clipboard:
$shares = Import-Csv .\Shares.csv'"' + ($shares.UNC -join '" "') + '"' | Set-ClipboardWith all shares in the clipboard, type the following, followed by inserting the clipboard after the “-d“ argument:
.\SauronEye.exe -f bak txt conf config -c -k kode pass -d <INSERT CLIPBOARD>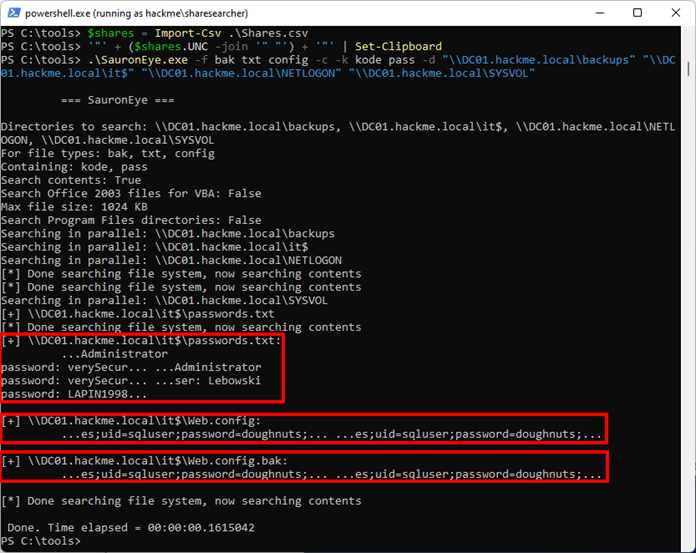
The above shows the scanning found three files containing credentials!
SauronEye will output identified keywords of each file, including text around it for context. Notice that the keyword is printed multiple times – this is a known bug in the SauronEye code.
Many filetypes and keywords can be used, here are some ideas to get you started:
Keywords: pass kode connectionstring api-key pwd
Filetypes: conf config json inf xml txt
Readable shares containing personal identifiable data
We can use SauronEye to scan for scanning for personal data and keywords may require some tweaking to your local language, try to use the following arguments:

Be aware that in Denmark, in case of exposure of personally identifiable information The Danish Data Protection Agency (Datatilsynet) may have to be notified, in some cases within a 72-hour deadline from the point of discovery. More information here: https://www.datatilsynet.dk/sikkerhedsbrud/anmeld-sikkerhedsbrud
Readable shares containing database and backup files
Databases and backups are also important to identify. They can for example contain PII, IP, and credentials. Again, here any credentials stored in databases (hashed or not) should be considered compromised and therefore revoked or changed.
For this scan we will only search for filetypes and not contents (databases and backups are usually compressed), use the following arguments:

Again here many filetypes can be used, use the ones above and extensions of your in-house backup solution, e.g. Veeam has VBK, VIB, and so on...

Modifiable shares containing applications and configurations
The last scanning is a bit different. Here we want to prevent a threat actor from:
Adding malicious code to application executable files
Adding malicious settings to application configuration files
Adding malicious files to application directories (e.g., DLL Search Order Hijacking)
Any of the above could result in malicious code being executed by other users/systems and thereby resulting in privilege escalation (execution by a higher privileged user) and persistence (execution by anyone later in case the threat actor gets detected and kicked out of your infrastructure).
To find all paths to some executable filetypes (filesec.io has more types) which may be modified by a threat actor use the command:
(Import-Csv .\Shares.csv).UNC | ForEach-Object {Get-ChildItem $_ -Recurse -ErrorAction SilentlyContinue -Include "*.exe","*.dll", "*.bat", "*.ps1" | select Directory}
The above lists full paths to all executables which is not that useful, instead we can list all directories of the executables:
(Import-Csv .\Shares.csv).UNC | ForEach-Object {Get-ChildItem $_ -Recurse -ErrorAction SilentlyContinue -Include "*.exe","*.dll", "*.bat", "*.ps1" | select Directory | select -Unique}
Auditing permissions of these directories is better, but even better would be to a list all shares containing executable files:
(Import-Csv .\Shares.csv).UNC | ForEach-Object {Get-ChildItem $_ -Recurse -ErrorAction SilentlyContinue -Include "*.exe","*.dll", "*.bat", "*.ps1" | select -ExpandProperty Directory | select -ExpandProperty Root | select -ExpandProperty FullName | select -Unique}
As per above, SYSVOL and NETLOGON are the only shares containing executables, from here SYSVOL is scanned using AccessEnum (NETLOGON is contained within SYSVOL so no need to scan both):

The we see that the directory in red “logonscript2022” grants Domain Users write permissions. In the directory the file “logon.bat” is likely a logon script added to AD users – if a threat actor can modify it, malicious code may be executed upon user logon:

Detect share enumeration with honey shares
The described techniques are useful for both blue and red teamers, but unfortunately also threat actors. Blue teamers are therefore recommended to create “honey shares” for detecting share enumeration. This can be done by enabling the audit policy “Advanced audit: Object Access: File Share”.
The audit policy is not enabled by default.
The following events IDs will then be generated:
5140: Share accessed
5142: Share added
5143: Share modified
5144: Share deleted
I have not dived into this defence, but here are resources to get you started:
https://docs.microsoft.com/en-us/windows/security/threat-protection/auditing/event-5140
https://cybersecthreat.com/2020/07/08/honey-file-security-monitoring/
https://github.com/nettitude/defensive-scripts/blob/master/HoneySHARE.md
A thought example is to create a hidden ‘$’ share with a name attractive to threat actor such as “backup_temp$” or “IT$” and alert on the share being accessed (Event ID 5140).