

Implementing application allowlisting should be one of the first priorities when securing a Windows Endpoint. Allowing only a specific set of applications to run on endpoints, besides some of Windows own binaries, can reduce the possibility of attackers executing arbitrary code on the endpoints.
Using Windows own application allowlisting solutions, we can choose from AppLocker and Windows Defender Application Control (formerly known as Device Guard or Configurable Code Integrity).
AppLocker
AppLocker is the easiest to configure, design and deploy; however, it’s possible for local administrators to bypass and disable this application whitelisting. AppLocker is mostly aimed towards low-privileged users, whereas Windows Defender Application Control is mostly aimed towards the Operating System itself.
Microsoft has developed a tool for automatically creating a default set of rules for AppLocker. This tool will also add the domain values for SYSVOL and NETLOGON, block executables used for AppLocker bypasses as well as deny access to specific paths used for AppLocker bypasses.
The tool is called AaronLocker and can be downloaded here: https://github.com/microsoft/AaronLocker
To deploy AaronLocker in your environment, run the following script on a reference computer: The reference computer should be a Windows client joined to the domain and identical to your regular production workstations, running the same applications as your workstations would normally run
Set-Location $env:APPDATA
Invoke-WebRequest https://github.com/microsoft/AaronLocker/archive/master.zip -OutFile .\AaronLocker.zip -UseBasicParsing
Expand-Archive .\AaronLocker.zip
Set-Location .\AaronLocker\AaronLocker-master\AaronLocker
Invoke-WebRequest https://download.sysinternals.com/files/AccessChk.zip -OutFile .\AccessChk.zip -UseBasicParsing
Expand-Archive .\AccessChk.zip
Copy-Item .\AccessChk\accesschk64.exe .\AccessChk.exe
Set-ExecutionPolicy -ExecutionPolicy Bypass -Scope Process -Force
.\Create-Policies.ps1
The script will automatically download AaronLocker and AccessChk (Sysinterals) and create a default set of AppLocker rules that can be deployed using Group Policy Objects.

Expected output from the Create-Policies script
Navigate to the .\Output folder and there should be two different sets of policies. One for Audit mode (Always audit before enforcing) and one for Enforce mode.

Navigate to the Domain Controller (DC) and create a new Group Policy Object (GPO), name it according to your internal naming schema.
Edit the settings for the GPO and navigate to Computer Configuration > Policies > Windows Settings > Security Settings > Application Control Policies
Now select 'Import Policy' and supply the Audit or Enforce policy just created with AaronLocker.

If we select 'Executable Rules' we'll see that AaronLocker has automatically created exceptions for SYSVOL and NETLOGON based on the internal domain name, as well as many other rules.

The thing i like about AaronLocker, compared to many other AppLocker rules, is that the script creates a lot of deny rules for Windows binaries (LOLBINS) that is utilized in AppLocker bypasses:

A detailed list of AppLocker bypasses can be found here: https://github.com/api0cradle/UltimateAppLockerByPassList
We're now ready to deploy AppLocker for our Windows workstations, however, the GPO is still missing an important setting. Before AppLocker can be successfully applied, we need to ensure that the 'Application Identity' service is set to 'Automatic' start-up. If this is not configured, AppLocker rules will not be applied. This is because AppLocker uses the 'Application Identity' service to verify the attributes of a file.

Link the GPO to the OU containing the workstations and log in to a workstation.
Run the following commands to verify that the AppLocker rules were applied:
gpupdate
Get-AppLockerPolicy -Effective | `
Select-Object RuleCollections -ExpandProperty RuleCollections
No need to run gpupdate /force unless you've changed currently applied GPO's.
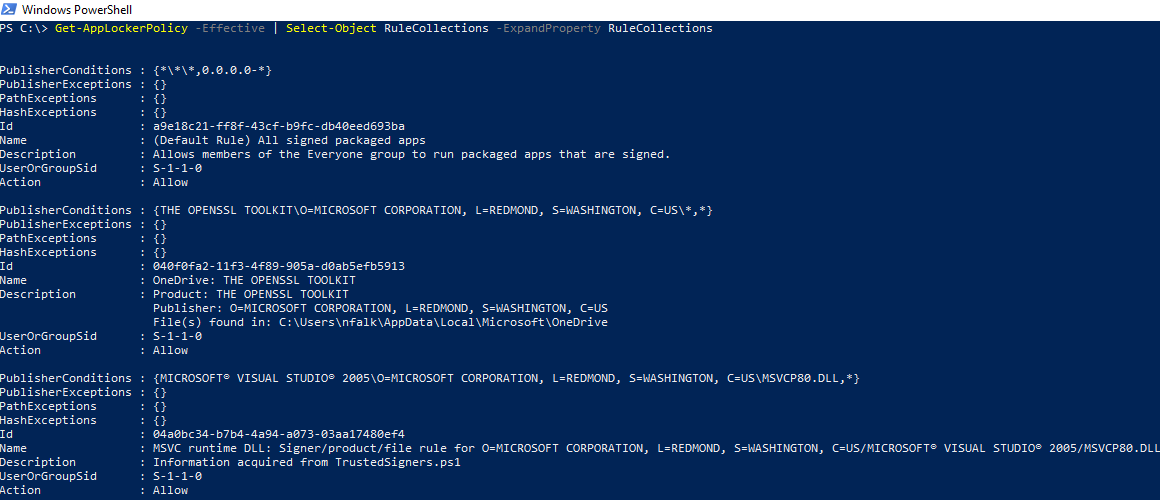
The workstation now has our AaronLocker rules applied and we're ready to block all kinds of applications and scripts.
Before applying the enforcing AppLocker ruleset, go to the Event Viewer and audit this log for a while to ensure that no legitimate applications are blocked.

Windows Defender Application Control (WDAC)
Windows Defender Application Control (WDAC) is a newer and much more secure solution for Application allowlisting; however, it is not as easy to configure, design and deploy as AppLocker is. Microsoft is presenting a lot of new features to WDAC and continuously expanding the capabilities.
WDAC policies apply to the managed computer as a whole and affect all users of the device. It is not possible to allowlist a specific application for one user, while blocking it for another user, on the same endpoint.
The big difference between WDAC and AppLocker is that AppLocker can be disabled or easily bypassed as soon as you're Administrator on the endpoint, whereas WDAC (if signed) cannot be disabled even from users escalating to SYSTEM. The only way to disable a signed WDAC policy is to create a new blank WDAC policy, sign it and push it to the already hardened endpoint. Since Windows 10 1903+ allows WDAC policies to use Path Rules, like we know from AppLocker, any user that successfully escalates to Administrator can just write their binary file to a whitelisted path and bypass WDAC blocking. This is why i recommend that path rules are not used in WDAC policies, unless you're trying to manage regular users that would otherwise have AppLocker applied and you're using applications that cannot be allowlisted in other ways.
To sum the WDAC and AppLocker differences up: WDAC is best when:
You are looking for the most secure Windows Application Control solution
All managed devices are running Windows 10 / Server 2016
You're managing the endpoints not the users
AppLocker is best when:
You don't need to control DDLs or drivers
You're manging the users not the endpoints
You're manging regular low-privileged users, not administrators
You still have Windows 7 / Server 2008 systems you need to manage
Before I continue and start creating WDAC policies, I just want to mention Microsoft's recommend block rules for WDAC policies. Security researcher has successfully bypassed WDAC in the past, using signed Windows binaries to do so, this is why Microsoft has created an officially recommended block ruleset.
This ruleset should be merged with your own WDAC policies. Link to block rules: https://docs.microsoft.com/en-us/windows/security/threat-protection/windows-defender-application-control/microsoft-recommended-block-rules
Like with AppLocker we need a reference computer. This computer should be running Windows 10 and should have any required enterprise application installed. I've installed a Windows 10 1909 Enterprise, to ensure that the latest and greatest features of WDAC are supported.
Run PowerShell or PowerShell ISE as Administrator to get started.
If we take a look at C:\Windows\schemas\CodeIntegrity\ExamplePolicies we see that Microsoft has placed some example policies for us to get started with WDAC.

As usual, we'll start with an Audit policy, to make sure we're not blocking any applications by accident.
I usually start with the AllowMicrosoft.xml policy and build the rest of the WDAC policies around this one. The AllowMicrosoft.xml policy includes the necessary Windows and 3rd party hardware and software kernel drivers, Windows Store apps and the root certificate for Microsoft products. If this WDAC is for a Privileged Access Workstation (PAW) or similar, I suggest not using any of these default policies but creating the entire policy yourself.
Let's take a look at the AllowMicrosoft.xml policy.

In the <Rules> section we see the following rule options enabled:
Unsigned System Integrity Policy
We'll get back to this one - Basically allows us to deploy WDAC policies which have not been signed with a Code Signing certificate
Advanced Boot Options
Disables the pre-boot F8 option
UMCI (User Mode Code Integrity)
Enables us to restrict user-mode binaries alongside kernel-mode binaries
Inherit Default Policy
This option is reserved for future use according to Microsoft
Update Policy No Reboot
Allows us to update the WDAC policy without requiring a reboot. Only supported on Windows 10 1709 and above
We'll extend these rules in our final WDAC policy, as we need to enable Audit Mode and other options enabled before we're ready to enforce.
Let's start with setting up the WDAC environment and copy this default ruleset to our folder.
Set-Location $env:APPDATA
New-Item -Name WDAC -ItemType Directory
Set-Location $env:APPDATA\WDAC
$WDACFolder = $env:APPDATA\WDAC
Copy-Item C:\Windows\schemas\CodeIntegrity\ExamplePolicies\AllowMicrosoft.xml $WDACFolder
Now navigate to the Microsoft Recommended Block Rules and copy the XML ruleset, paste the rules to a notepad (or any text editor) and go to line 798 and remove the 3 highlighted deny rules:

Rules to delete
Do not delete the rules, if you're using a Windows 10 version below 1903. If that is the case, delete the comments at line 65 according to your Windows version.
Now save the file as BlockRules.XML (UTF-8) in $env:APPDATA\WDAC.
Next, we need to scan Program Files and Program Files (x86) for any installed application that we want to allow in the WDAC policy.
New-CIPolicy -FilePath .\ProgramFiles.xml -ScanPath $env:ProgramFiles `
-Level Publisher -UserPEs
New-CIPolicy -FilePath .\ProgramFiles86.xml -ScanPath ${env:ProgramFiles(x86)} `
-Level Publisher -UserPEs
New-CIPolicy - Creates a Code Integrity policy as an .xml file
FilePath - Specify the name of our CI XML file
ScanPath - Specify the path we wish to scan
Level - Specify what kind of level we need for the policy
Possible values: None, Hash, FileName, FilePath, SignedVersion, PFN, Publisher, FilePublisher, LeafCertificate, PcaCertificate, RootCertificate, WHQL, WHQLPublisher, WHQLFilePublisher
UserPEs - Scan for user-mode binaries
I usually use the -Level Publisher when scanning. You might already know this Level from typical AppLocker policies. Once again, I do not condone using FilePath as a fallback, since an attacker successfully escalating to Administrator might be able to overwrite or otherwise tamper with this file in a allowlisted path and bypass WDAC.
The following link explains each level in detail: https://docs.microsoft.com/en-gb/windows/security/threat-protection/windows-defender-application-control/select-types-of-rules-to-create#windows-defender-application-control-file-rule-levels
Now wait as the scan finishes, this might take a while depending on how many applications you have installed

When the scan completes, it will create an XML, specified in -FilePath, as well as a tmp file placed in %TEMP%.

Since this reference computer is a VM, used only for testing, VMware Tools is installed, and we see in the tmp file that these DLL's are not signed by VMware.
You're reference computer should be physical, on the same hardware as the machine you want to protect with WDAC

Since these DLLs are not signed, we need to utilize the -Fallback switch to the New-CIPolicy command if we want to continue to use these DLLs after WDAC is enforced.
New-CIPolicy -FilePath .\ProgramFiles.xml `
-ScanPath $env:ProgramFiles -Level Publisher -UserPEs -Fallback Hash
No tmp file is created after this scan and we see our ProgramFiles.xml includes these hash rules:

Of course these are hash rules and they might very well change when VMware tools is updated, breaking our WDAC policy. Sadly I see many vendors not signing their applications, which is a shame. You could use the Fallback switch 'FilePath' and end up with something like the picture below, but use with care!
<FileRules>
<Allow ID="ID_ALLOW_A_3" FriendlyName="C:\Program Files\Common Files\VMware\Drivers\efifw\Win8\efifwver.dll FileRule" MinimumFileVersion="0.0.0.0" FilePath="C:\Program Files\Common Files\VMware\Drivers\efifw\Win8\efifwver.d
ll" />
<Allow ID="ID_ALLOW_A_4" FriendlyName="C:\Program Files\Common Files\VMware\Drivers\efifw\Win8\efifwver.dll FileRule" MinimumFileVersion="0.0.0.0" FilePath="C:\Program Files\Common Files\VMware\Drivers\efifw\Win8\efifwver.d
ll" />
</FileRules>
For a somewhat static machine as a PAW, I would only allow Microsoft application, however, I have encountered environments where a third party application is a hard requirement on this PAW. If this is the case, and the application is not signed, I recommend using the Fallback switch with hash and these PAW boxes usually are stand-alone and not even able to pull update from a management server because of network restrictions.
Our scan is now complete and we're ready to merge our policies.

If you're using any application(s) that installs in C:\Windows (looking at your Carbon Black) or other paths outside of Program Files, remember to also scan these folders as well
You should have a minimum of 4 policies at this moment. The block rules, the allow Microsoft example rules and the Program Files ruleset. Next, we need to merge all these rules into a single XML file.
Merge-CIPolicy -OutputFilePath .\MergedCIPolicies.xml `
-PolicyPaths .\AllowMicrosoft.xml,.\BlockRules.xml,.\ProgramFiles.xml,.\ProgramFiles86.xml
Our 'MergedCIPolicies.xml' has been created but first, we need to review the rules added to this policy. Let's have a look inside the file.

We still have the original rules, but Audit mode and Enforce Store Applications have been added. Audit Mode is definitely a feature we need since this policy has to be audited before deploying with enforce. Enforce Store Applications has been added as well, this rule will apply WDAC rules to Universal Windows applications.
We do still need to add a few rules. Run the following code to add:
2 - WHQL - Requires any driver executes to be WHQL signed
19 - Dynamic Code Security - Enables policy enforcement for .NET applications and DLLs - Only supported only Windows 10 1803 and above
Set-RuleOption -FilePath .\MergedCIPolicies.xml -Option 2
Set-RuleOption -FilePath .\MergedCIPolicies.xml -Option 19
This version is 10.0.0.0 so lets bump it to 11.0.0.0, convert our policy to a BIN file and deploy it locally
Set-CIPolicyVersion -FilePath .\MergedCIPolicies.xml -Version "11.0.0.0"
ConvertFrom-CIPolicy -XmlFilePath .\MergedCIPolicies.xml `
-BinaryFilePath .\WDAC-Audit-MicrosoftAllow.bin
Move-Item .\WDAC-Audit-MicrosoftAllow.bin `
C:\Windows\System32\CodeIntegrity\SIPolicy.p7b -Force
The WDAC-Audit-MicrosoftAllow.bin file can now be deployed with endpoint management solutions like Group Policies or Intune. Since we've moved the file to C:\Windows\System32\CodeIntegrity\SIPolicy.p7b it is already deployed locally.
If you want to use GPO to deploy this WDAC BIN, please configure the following GPO:
Computer Configuration > Policies > Administrative Templates > System > Device Guard : Deploy Windows Defender Application Control

Ensure that the local machine account has read access to this BIN file on the specified share. If you're deploying in an on-premises Active Directory environment, you could just allow 'Domain Computers' to read this file.
WDAC is now deployed to our references computer - You can verify this by opening msinfo32 or by looking in the Event Viewer.

msinfo32.exe
Try running an application that is not included in the WDAC policy and review the following event log:
Applications and Services Logs\Microsoft\Windows\CodeIntegrity\Operational Event ID 3076

We notice that RuntimeBroker.exe attempted to load rufus-3.9.exe. Rufus is signed, but the certificate has not been scanned and added to the policy. Continue to do your regular tasks on this reference computer and review the event log.
If you're satisfied with the WDAC policy, let’s enforce it.
The rule option 3 is Audit mode, so we need to remove this and redeploy an enforce policy. We copy our Audit policy, bump the version number, delete options 3 (Audit) and convert the XML policy to a BIN file.
Copy-Item .\MergedCIPolicies.xml -Destination .\MergedCIPoliciesEnforce.xml
Set-CIPolicyVersion -FilePath .\MergedCIPoliciesEnforce.xml -Version "12.0.0.0"
Set-RuleOption -FilePath .\MergedCIPoliciesEnforce.xml -Option 3 -Delete
ConvertFrom-CIPolicy -XmlFilePath .\MergedCIPoliciesEnforce.xml -BinaryFilePath .\WDAC-MicrosoftAllow-Enforce.bin
Copy-Item .\WDAC-MicrosoftAllow-Enforce.bin C:\Windows\System32\CodeIntegrity\SIPolicy.p7b
To ensure our WDAC switches to enforce let's reboot the reference computer.
Try to run Rufus once again and we'll notice WDAC is blocking the application. In the background of the picture we see msinfo32 running, showing that we've switched to "Enforce" mode.

Show me the code
#Setting environment
Set-Location $env:APPDATA
New-Item -Name WDAC -ItemType Directory
Set-Location $env:APPDATA\WDAC
Copy-Item C:\Windows\schemas\CodeIntegrity\ExamplePolicies\AllowMicrosoft.xml .\AllowMicrosoft.xml
#Audit mode
New-CIPolicy -FilePath .\ProgramFiles.xml -ScanPath $env:ProgramFiles -Level Publisher -UserPEs -Fallback Hash
New-CIPolicy -FilePath .\ProgramFiles86.xml -ScanPath ${env:ProgramFiles(x86)} -Level Publisher -UserPEs -Fallback Hash
Merge-CIPolicy -OutputFilePath .\MergedCIPolicies.xml -PolicyPaths .\AllowMicrosoft.xml,.\BlockRules.xml,.\ProgramFiles.xml,.\ProgramFiles86.xml
Set-RuleOption -FilePath .\MergedCIPolicies.xml -Option 2
Set-RuleOption -FilePath .\MergedCIPolicies.xml -Option 3
Set-RuleOption -FilePath .\MergedCIPolicies.xml -Option 19
Set-CIPolicyVersion -FilePath .\MergedCIPolicies.xml -Version "11.0.0.0"
ConvertFrom-CIPolicy -XmlFilePath .\MergedCIPolicies.xml -BinaryFilePath .\WDAC-MicrosoftAllow-Audit.bin
Copy-Item .\WDAC-MicrosoftAllow-Audit.bin C:\Windows\System32\CodeIntegrity\SIPolicy.p7b
#Enforce mode
Copy-Item .\MergedCIPolicies.xml -Destination .\MergedCIPoliciesEnforce.xml
Set-CIPolicyVersion -FilePath .\MergedCIPoliciesEnforce.xml -Version "12.0.0.0"
Set-RuleOption -FilePath .\MergedCIPoliciesEnforce.xml -Option 3 -Delete
ConvertFrom-CIPolicy -XmlFilePath .\MergedCIPoliciesEnforce.xml -BinaryFilePath .\WDAC-MicrosoftAllow-Enforce.bin
Copy-Item .\WDAC-MicrosoftAllow-Enforce.bin C:\Windows\System32\CodeIntegrity\SIPolicy.p7b
PowerShell is also set to Constrained Language Mode, which prevents adding types, invocation of Win32 APIs, COM objects are blocked and much more.

WDAC is deployed and enforced, but we still need to sign our policy. If the policy is not signed, it is possible for an administrator to delete the policy or simply overwrite it with one not blocking anything.
For this we need a Code Signing certificate. Can be issued from internal CA or be purchased from third party. In this example I'll use an internal CA.
Sign in to your CA or issuing CA and go to Certificate Templates > Manage Select the Code Signing template and select Duplicate Template

Use the following settings for the new Code Signing certificate template
Compatibility - Certification Authority - Windows Server 2012
Compatibility - Certificate recipient - Windows 8 / Windows Server 2012
General - Template display name - WDAC Policy Signing
Request Handling - Allow private key to be exported - Enable
Extensions - Basic Constrains - Enable this extension
Issuance Requirements - CA certificate manager approval - Enabled
Subject Name - Supply in the request - Enabled
Security - Verify that only Domain Admins or equivalent Tier 0 identities are allowed to write / enroll
Publish the certificate template and request a new code signing certificate, using an account with enroll permissions on the reference computer.

We're prompted to more information when trying to enroll - Choose 'Click here to configure settings'.

Add a Common Name of WDACSigningCertificate

Approve the certificate request on the issuing CA and return to the reference computer.
We need SignTool.exe in order to sign our policy, which can be downloaded using the following PowerShell code. Beware that this download is ~800MB.
#Download SignTool
Set-Location $env:APPDATA
Invoke-WebRequest http://go.microsoft.com/fwlink/p/?LinkID=2022797 -OutFile W10SDK.iso -UseBasicParsing
Mount-DiskImage C:\Users\root\AppData\Roaming\W10SDK.iso
msiexec.exe /q /i 'D:\Installers\Windows SDK Signing Tools-x86_en-us.msi'
Dismount-DiskImage C:\Users\root\AppData\Roaming\W10SDK.iso
Remove-Item .\W10SDK.iso -Force
By now we should have requested a code signing certificate, had our request approved and installed SignTool.exe.
Lets bump the version once again, export our certificate (no need to export private key, since the certificate resides in the local store), remove the rule option 6 which is signing not required, create a bin file and finally sign the bin and deploy.
#Enforce mode - Signed
Copy-Item .\MergedCIPoliciesEnforce.xml -Destination .\MergedCIPoliciesEnforceSigned.xml
Set-CIPolicyVersion -FilePath .\MergedCIPoliciesEnforceSigned.xml -Version "13.0.0.0"
Get-ChildItem -Path Cert:\CurrentUser\My\ | Where {$_.Subject -like "*WDACSigningCertificate*"} | Export-Certificate -Type CERT -FilePath .\WDACSigningCertificate.cer
Add-SignerRule -FilePath .\MergedCIPoliciesEnforceSigned.xml -CertificatePath .\WDACSigningCertificate.cer -User -Kernel -Update
Set-RuleOption -FilePath .\MergedCIPoliciesEnforceSigned.xml -Option 6 -Delete
ConvertFrom-CIPolicy -XmlFilePath .\MergedCIPoliciesEnforceSigned.xml -BinaryFilePath .\WDAC-MicrosoftAllow-Enforce-Signed.bin
& 'C:\Program Files (x86)\Windows Kits\10\bin\10.0.17763.0\x64\signtool.exe' sign -v /n "WDACSigningCertificate" -p7 . -p7co 1.3.6.1.4.1.311.79.1 -fd sha256 .\WDAC-MicrosoftAllow-Enforce-Signed.bin
Copy-Item .\WDAC-MicrosoftAllow-Enforce-Signed.bin.p7 C:\Windows\System32\CodeIntegrity\SIPolicy.p7b -Force
The WDAC-MicrosoftAllow-Enforce-Signed.bin.p7 file can be deployed locally, using GPO or Intune like the other BIN files we've created. I'm going to deploy it locally for testing purposes.
That's it. We have a signed WDAC policy deployed!
#Setting environment
Set-Location $env:APPDATA
New-Item -Name WDAC -ItemType Directory
Set-Location $env:APPDATA\WDAC
Copy-Item C:\Windows\schemas\CodeIntegrity\ExamplePolicies\AllowMicrosoft.xml .\AllowMicrosoft.xml
#Audit mode
New-CIPolicy -FilePath .\ProgramFiles.xml -ScanPath $env:ProgramFiles -Level Publisher -UserPEs -Fallback Hash
New-CIPolicy -FilePath .\ProgramFiles86.xml -ScanPath ${env:ProgramFiles(x86)} -Level Publisher -UserPEs -Fallback Hash
Merge-CIPolicy -OutputFilePath .\MergedCIPolicies.xml -PolicyPaths .\AllowMicrosoft.xml,.\BlockRules.xml,.\ProgramFiles.xml,.\ProgramFiles86.xml
Set-RuleOption -FilePath .\MergedCIPolicies.xml -Option 2
Set-RuleOption -FilePath .\MergedCIPolicies.xml -Option 19
Set-CIPolicyVersion -FilePath .\MergedCIPolicies.xml -Version "11.0.0.0"
ConvertFrom-CIPolicy -XmlFilePath .\MergedCIPoliciesEnforce.xml -BinaryFilePath .\WDAC-MicrosoftAllow-Enforce.bin
Copy-Item .\WDAC-MicrosoftAllow-Enforce.bin C:\Windows\System32\CodeIntegrity\SIPolicy.p7b
#Enforce mode
Copy-Item .\MergedCIPolicies.xml -Destination .\MergedCIPoliciesEnforce.xml
Set-CIPolicyVersion -FilePath .\MergedCIPoliciesEnforce.xml -Version "12.0.0.0"
Set-RuleOption -FilePath .\MergedCIPoliciesEnforce.xml -Option 3 -Delete
ConvertFrom-CIPolicy -XmlFilePath .\MergedCIPoliciesEnforce.xml -BinaryFilePath .\WDAC-Audit-MicrosoftAllow-Enforce.bin
Copy-Item .\WDAC-Audit-MicrosoftAllow-Enforce.bin C:\Windows\System32\CodeIntegrity\SIPolicy.p7b
#Download SignTool
Invoke-WebRequest http://go.microsoft.com/fwlink/p/?LinkID=2022797 -OutFile W10SDK.iso -UseBasicParsing
Mount-DiskImage C:\Users\root\AppData\Roaming\W10SDK.iso
msiexec.exe /q /i 'D:\Installers\Windows SDK Signing Tools-x86_en-us.msi'
Dismount-DiskImage C:\Users\root\AppData\Roaming\W10SDK.iso
Remove-Item .\W10SDK.iso -Force
#Enforce mode - Signed
Copy-Item .\MergedCIPoliciesEnforce.xml -Destination .\MergedCIPoliciesEnforceSigned.xml
Set-CIPolicyVersion -FilePath .\MergedCIPoliciesEnforceSigned.xml -Version "13.0.0.0"
Get-ChildItem -Path Cert:\CurrentUser\My\ | Where {$_.Subject -like "*WDACSigningCertificate*"} | Export-Certificate -Type CERT -FilePath .\WDACSigningCertificate.cer
Add-SignerRule -FilePath .\MergedCIPoliciesEnforceSigned.xml -CertificatePath .\WDACSigningCertificate.cer -User -Kernel -Update
Set-RuleOption -FilePath .\MergedCIPoliciesEnforceSigned.xml -Option 6 -Delete
ConvertFrom-CIPolicy -XmlFilePath .\MergedCIPoliciesEnforceSigned.xml -BinaryFilePath .\WDAC-MicrosoftAllow-Enforce-Signed.bin
& 'C:\Program Files (x86)\Windows Kits\10\bin\10.0.17763.0\x64\signtool.exe' sign -v /n "WDACSigningCertificate" -p7 . -p7co 1.3.6.1.4.1.311.79.1 -fd sha256 .\WDAC-MicrosoftAllow-Enforce-Signed.bin
Copy-Item .\WDAC-MicrosoftAllow-Enforce-Signed.bin.p7 C:\Windows\System32\CodeIntegrity\SIPolicy.p7b -Force
AaronLocker and WDAC
While writing this blog post I noticed that support for WDAC was added to AaronLocker. Since I often use AaronLocker for AppLocker configuration and have had great results, let's see if AaronLocker for WDAC is as impressive.
Let's pull the latest version of AaronLocker and create the WDAC rules
Set-Location $env:APPDATA
Invoke-WebRequest https://github.com/microsoft/AaronLocker/archive/master.zip -OutFile .\AaronLocker.zip -UseBasicParsing
Expand-Archive .\AaronLocker.zip
Set-Location .\AaronLocker\AaronLocker-master\AaronLocker
Set-ExecutionPolicy -ExecutionPolicy Bypass -Scope Process -Force
.\Create-Policies.ps1 -AppLockerOrWDAC WDAC
Let's examine the WDAC policy placed in the Output folder.
First off, we see that New-CIPolicy was executed with the FilePath switch. This can be abused by an attacker to bypass WDAC if the attacker is able to write to any of these paths.

Instead of creating Publisher rules for any installed applications in Program Files, the entire path has been allowlisted. I assume that AaronLocker is doing this because this is an easier way of managing WDAC in the enterprise.
To verify this claim, we look at the Create-Policies-WDAC.ps1 script, running in the background creating these CI policies. https://github.com/microsoft/AaronLocker/blob/master/AaronLocker/Create-Policies-WDAC.ps1
Navigate to line 54-62 and we see that AaronLocker indeed is allowlisting Windir and Program Files.

Create-Policies-WDAC.ps1
We also have the usual SYSVOL and NETLOGON allowlisting that we know from AaronLocker AppLocker edition.

The AaronLocker WDAC also does not include Microsoft's recommended block rules, if you want to run WDAC with these rules you should manually merge them with this WDAC policy.
If this WDAC policy fits your environment, compile it and deploy.
ConvertFrom-CIPolicy -XmlFilePath .\Outputs\WDACRules-20200425-1123-Allow-Audit.xml -BinaryFilePath .\WDAC-AaronLocker-Audit.bin
Copy-Item .\WDAC-AaronLocker-Audit.bin C:\Windows\System32\CodeIntegrity\SiPolicy.p7b -Force’
Once again the bin can be used for managed deployment.
Really great work from Aaron Margosis once again - If you're new to WDAC and want a quick config to play with i highly recommend the AaronLocker WDAC edition, just be aware that FilePaths are not the most secure WDAC configuration.
I hope this blog inspires you to deploy Application allowlisting on your endpoints. Application allowlisting is definitely a quick and very effective way of blocking the unknown from running on your endpoints - Feel free to reach out to me if you have any AppLocker / WDAC questions.